How to implement Pie Progress View in Android

I will be showing how to implement a Pie Progress View in an Android app. I’ve been asked asked to develop an Android app which contained a progress view in shape of a pie chart to show a countdown progress, so the view has to update every second.

Something like this:

screen-shot-2016-10-05-at-4-31-06-pm

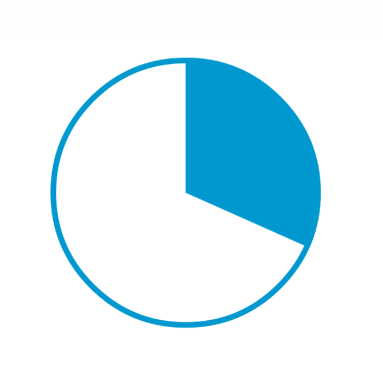
To achieve this without reinventing the wheel, I fortunately found that David had created this drawable as you can see here.

So I will be showing how to implement his class, add it to an ImageView, change its color and update the progress.

First of all, we have to copy that class into our project. Once that is done, we will create an ImageView in the xml where we want to show the Pie Progress View:

<ImageView                  
android:id="@+id/time_progress"                  
android:layout_width="40dp"                  
android:layout_height="40dp"/>

In our activity’s or fragment’s onCreate we will create a new instance of the PieProgressDrawable class and set it’s color (in this case to white):

PieProgressDrawable pieProgressDrawable = new PieProgressDrawable();
pieProgressDrawable.setColor(ContextCompat.getColor(this, R.color.white));

Now we will set this drawable to our XML ImageView:

ImageView timeProgress = (ImageView) findViewById(R.id.time_progress);
timeProgress.setImageDrawable(pieProgressDrawable);

Now, let’s assume we have a CountDownTimer implemented which every few seconds calls a method passing a new progress to update the Pie Progress View:

    public void updateTime(int progress) {
        pieProgressDrawable.setLevel(progress);
        timeProgress.invalidate();
    }

pieProgressDrawable.setLevel(progress)  will set the drawable’s progress level. The level is then used to create a drawable with specific angles, colors and shapes to represent the Pie Drawable as you can see in PieProgressDrawable class method:

    @Override
    protected boolean onLevelChange(int level) {
        final float drawTo = START_ANGLE + ((float)360*level)/100f;
        boolean update = drawTo != mDrawTo;
        mDrawTo = drawTo;
        return update;
    }

Finally, in order to update the UI to show the new progress we need to redraw the drawable by calling: timeProgress.invalidate();

That’s it! Here’s the complete PieProgressDrawable class in case the gist is not available anymore:

import android.graphics.Canvas;
import android.graphics.ColorFilter;
import android.graphics.Paint;
import android.graphics.Rect;
import android.graphics.RectF;
import android.graphics.drawable.Drawable;
import android.util.DisplayMetrics;

/**
 * A PieProgressDrawable does this:
 * <a href="http://stackoverflow.com/questions/12458476/how-to-create-circular-progress-barpie-chart-like-indicator-android">Circular Progress Bar Android</a>
 */
public class PieProgressDrawable extends Drawable {

    Paint mPaint;
    RectF mBoundsF;
    RectF mInnerBoundsF;
    final float START_ANGLE = 0.f;
    float mDrawTo;

    public PieProgressDrawable() {
        super();
        mPaint = new Paint(Paint.ANTI_ALIAS_FLAG);
    }

    /**
     * Set the border width.
     * @param widthDp in dip for the pie border
     */
    public void setBorderWidth(float widthDp, DisplayMetrics dm) {
        float borderWidth = widthDp * dm.density;
        mPaint.setStrokeWidth(borderWidth);
    }

    /**
     * @param color you want the pie to be drawn in
     */
    public void setColor(int color) {
        mPaint.setColor(color);
    }

    @Override
    public void draw(Canvas canvas) {
        // Rotate the canvas around the center of the pie by 90 degrees
        // counter clockwise so the pie stars at 12 o'clock.
        canvas.rotate(-90f, getBounds().centerX(), getBounds().centerY());
        mPaint.setStyle(Paint.Style.STROKE);
        canvas.drawOval(mBoundsF, mPaint);
        mPaint.setStyle(Paint.Style.FILL);
        canvas.drawArc(mInnerBoundsF, START_ANGLE, mDrawTo, true, mPaint);

        // Draw inner oval and text on top of the pie (or add any other
        // decorations such as a stroke) here..
        // Don't forget to rotate the canvas back if you plan to add text!
        // ...
    }

    @Override
    protected void onBoundsChange(Rect bounds) {
        super.onBoundsChange(bounds);
        mBoundsF = mInnerBoundsF = new RectF(bounds);
        final int halfBorder = (int) (mPaint.getStrokeWidth()/2f + 0.5f);
        mInnerBoundsF.inset(halfBorder, halfBorder);
    }

    @Override
    protected boolean onLevelChange(int level) {
        final float drawTo = START_ANGLE + ((float)360*level)/100f;
        boolean update = drawTo != mDrawTo;
        mDrawTo = drawTo;
        return update;
    }

    @Override
    public void setAlpha(int alpha) {
        mPaint.setAlpha(alpha);
    }

    @Override
    public void setColorFilter(ColorFilter cf) {
        mPaint.setColorFilter(cf);
    }

    @Override
    public int getOpacity() {
        return mPaint.getAlpha();
    }
}

What’s new in Android N: Google I/O Keynote 2016

Screen Shot 2016-05-20 at 4.32.34 PM

At the very beginning of this year’s Google’s developer conference, the company announced its latest features and improved services: Android N, Daydream VR, Android Wear 2.0, Google Home and the new Allo and Duo apps were the stars of the opening keynote. 

So let’s focus on the latest news about the newest Android version, and what features we will find later this year in Android N’s final release: 

Performance

Google focused on improving two key areas: graphics and runtime.

Vulkan

Android N adds native support for this modern 3D graphics API, designed to give game developers direct control of the GPU to produce incredible graphics and compute performance.

Because it has a lower CPU usage than OpenGL, game developers are able to squeeze in more effects per frame while still maintaining a high frame rate.

Android Runtime

A new JIT Compiler was added to improve software performance, make installs faster, and reduce the amount of storage needed for apps on the device.

“The new JIT compiler allows installs to be 75% faster. And because it is more selective about which methods it compiles, it reduces the amount of storage by a 50%.” – Dave Burke at Google I/O 2016

JIT performance
The compiler in N performs 30% to 600% faster than major CPU benchmarks.

Security

Google stressed improvements in security through 3 key ways:

File-based encryption

Meaning that Android N encrypts at file level instead of block level, which allows to better isolate and protect individual users of the system.

Media framework hardening 

In N, key subsystems are split into individual SELinux protected processes.

“By improving the security of the media framework we improve the security of the entire device.” – Dave Burke at Google I/O 2016.

Seamless updates

We can say goodbye to the annoying ‘Android is upgrading message’ thanks to this new feature. When an update is available your phone will automatically download the new system image in background, so the next time you power up your phone it will seamlessly switch in to the new software image.

N automatically keeps your phone up to date with the latest version of the system software without you having to do anything.

Note: apparently, seamless updates won’t be able in current Nexus devices. Check the entire post from Android Police here.

Productivity

Multi-tasking and Multi-window

The window management framework was modified to display more than one app at the time.

Quick switch

It is now possible to switch to the previous app you’ve been using by double tapping the recents button.

Split screen

Android N adds native support to display more than one app at the same time. This feature, designed for tablets and phones, works by long tapping on the rec
ents button to enter multi window from where you can launch the second app.

splitscreen

Improved Notifications

Since more than half of the notifications in Android come from messaging apps, Google has decided to add ‘Direct Reply’ feature. This way, a user can quickly reply to a message without having to launch the app to send a response.

Screen Shot 2016-05-19 at 11.46.14 PM

It is also possible to change notifications settings, such as blocking or silencing it, by just long tapping on it.

“To wrap up: We’ve made it faster and more performant with a powerful new JIT Compiler and Vulkan 3D graphics. We are continuing to harden our security and provide the first truly seamless software updates system for mobile. And we are making users more productive with better multi tasking, and brand new multi window support, and improved notifications.” – Dave Burke, VP of Engineering at Google.

summaryPicture

Google expects to launch the final N release later this year, but in case you can’t wait, you can enter the new beta program announced at Keynote hereNote: only available for Nexus 6, Nexus 9, Nexus 5x, Nexus 6p, Nexus Player and Pixel C.

In case you missed the event, you can watch the entire Google I/O Keynote here.

Horizontal RecyclerView inside a Vertical RecyclerView

This is a simple tutorial to develop a scrolling horizontal RecyclerView inside a vertical RecyclerView in Android.

First, we will create the main layout that shows the vertical RecyclerView:

courses_fragment.xml

<RelativeLayout xmlns:android="http://schemas.android.com/apk/res/android"
    android:layout_width="match_parent"
    android:layout_height="match_parent"
    xmlns:app="http://schemas.android.com/apk/res-auto"
    android:paddingLeft="15dp"
    android:paddingRight="15dp">

    <android.support.v7.widget.RecyclerView
        android:layout_width="match_parent"
        android:layout_height="match_parent"
        android:id=“@+id/vertical_courses_list"
        android:visibility="gone"/>


</RelativeLayout>

It’s a simple relative layout with a RecyclerView in it.

Now let’s create the layout for each item of the vertical RecyclerView:

courses_item.xml

<RelativeLayout
    xmlns:android="http://schemas.android.com/apk/res/android"
    android:layout_width="match_parent"
    android:layout_height="match_parent"
    android:layout_marginTop="15dp"
    android:layout_marginBottom="15dp">

    <LinearLayout
        android:layout_width="wrap_content"
        android:layout_height="wrap_content"
        android:orientation="vertical"
        android:layout_alignParentLeft="true"
        android:layout_centerVertical="true">

        <TextView
            android:id="@+id/course_item_name_tv"
            android:layout_width="wrap_content"
            android:layout_height="wrap_content"
            style="@style/RegularTextStyle"/>

        <android.support.v7.widget.RecyclerView
            android:id="@+id/horizontal_list"
            android:layout_width="match_parent"
            android:layout_marginTop="5dp"
            android:layout_height="30dp"
            android:visibility="visible"/>

    </LinearLayout>
    <ImageView
    		android:layout_width="wrap_content"
    		android:layout_height="wrap_content"
    		android:layout_alignParentRight="true"
    		android:layout_centerVertical="true"
    		android:src="@drawable/ic_play_circle_outline_white_24dp"
    		android:tint="@color/colorAccent"/>


</RelativeLayout>

We’ve made a Relative layout with a TextView that displays a Name, an Arrow to the right, and an inside RecyclerView below the Name.

Note: it is important that the inner RecyclerView has layout_height assigned, it won’t work with match_parent or wrap_content.

The same way we created a layout for each item of the main RecyclerView, we will have to create a new layout for each item of the inner horizontal RecyclerView: 

courses_horizontal_item.xml

<LinearLayout xmlns:android="http://schemas.android.com/apk/res/android"
    android:orientation="vertical" android:layout_width="match_parent"
    android:layout_height="match_parent"
    android:layout_marginRight="3dp">

    <TextView
        android:id="@+id/horizontal_item_text"
        android:textColor="@color/white"
        android:layout_width="match_parent"
        android:padding="5dp"
        android:layout_height="wrap_content"
        android:gravity="center_vertical"/>

</LinearLayout>

Good! We are done with xml files. Now we have to create the adapters for each RecyclerView. Let’s start with inner Horizontal RecyclerView adapter:

HorizontalRVAdapter

public class HorizontalRVAdapter extends RecyclerView.Adapter<RecyclerView.ViewHolder> {

    private List<String> mDataList;
    private int mRowIndex = -1;

    public HorizontalRVAdapter() {
    }

    public void setData(List<String> data) {
        if (mDataList != data) {
            mDataList = data;
            notifyDataSetChanged();
        }
    }

    public void setRowIndex(int index) {
        mRowIndex = index;
    }

    private class ItemViewHolder extends RecyclerView.ViewHolder {

        private TextView text;

        public ItemViewHolder(View itemView) {
            super(itemView);
            text = (TextView) itemView.findViewById(R.id.horizontal_item_text);
        }
    }

    @Override
    public RecyclerView.ViewHolder onCreateViewHolder(ViewGroup parent, int viewType) {
        Context context = parent.getContext();
        View itemView = LayoutInflater.from(context).inflate(R.layout.courses_horizontal_item, parent, false);
        ItemViewHolder holder = new ItemViewHolder(itemView);
        return holder;
    }

    @Override
    public void onBindViewHolder(RecyclerView.ViewHolder rawHolder, int position) {
        ItemViewHolder holder = (ItemViewHolder) rawHolder;
        holder.text.setText(mDataList.get(position));
        holder.itemView.setTag(position);
    }

    @Override
    public int getItemCount() {
        return mDataList.size();
    }

}

Here we inflate the layout for each item of the horizontal RecyclerView and set data to each view. In this case we only have a TextView which is filled with a String from List<String>, but views and lists can be customized and be more complex according to each need.

Now let’s wrap it all together in the main RecyclerView adapter:

CourseRVAdapter

public class CourseRVAdapter extends RecyclerView.Adapter<CourseRVAdapter.SimpleViewHolder> {

    private final Context mContext;
    private static List<Nugget> mData;
    private static RecyclerView horizontalList;

    public static class SimpleViewHolder extends RecyclerView.ViewHolder {
        public final TextView title;
        private HorizontalRVAdapter horizontalAdapter;

        public SimpleViewHolder(View view) {
            super(view);
            Context context = itemView.getContext();
            title = (TextView) view.findViewById(R.id.course_item_name_tv);
            horizontalList = (RecyclerView) itemView.findViewById(R.id.horizontal_list);
            horizontalList.setLayoutManager(new LinearLayoutManager(context, LinearLayoutManager.HORIZONTAL, false));
            horizontalAdapter = new HorizontalRVAdapter();
            horizontalList.setAdapter(horizontalAdapter);
        }
    }

    public CourseRVAdapter(Context context, List<Nugget> data) {
        mContext = context;
        if (data != null)
            mData = new ArrayList<>(data);
        else mData = new ArrayList<>();
    }

    public SimpleViewHolder onCreateViewHolder(ViewGroup parent, int viewType) {
        final View view = LayoutInflater.from(mContext).inflate(R.layout.courses_item, parent, false);
        return new SimpleViewHolder(view);
    }

    @Override
    public void onBindViewHolder(SimpleViewHolder holder, final int position) {
        holder.title.setText(mData.get(position).getTitle());
        holder.horizontalAdapter.setData(mData.get(position).getTags()); // List of Strings
        holder.horizontalAdapter.setRowIndex(position);
    }

    @Override
    public int getItemCount() {
        return mData.size();
    }
    
}

And finally, we set the main RecyclerView adapter in our Activity/Fragment:

private CourseRVAdapter adapter;

… 

// Setting RecyclerView
coursesRecyclerView.setHasFixedSize(true);
LinearLayoutManager llm = new LinearLayoutManager(getActivity());
coursesRecyclerView.setLayoutManager(llm);
// nuggetsList is an ArrayList of Custom Objects, in this case  Nugget.class
adapter = new CourseRVAdapter(getActivity(), nuggetsList);
coursesRecyclerView.setAdapter(adapter);

ExoPlayer – Add simple audio player to Android

If you have ever had to develop an Android app that played audio or video, you must have heard of MediaPlayer, a quick solution provided by Android framework for playing media.

Yes, it is simple to use. With only a few lines of code you can reproduce basic audio or video. But what if you need more features?

ExoPlayer

ExoPlayer is an open sourced media player built on Android’s low level media APIs. It’s designed to be easy to customize and extend, allowing many components to be replaced with custom implementations.

Advantages

ExoPlayer has a number of advantages over Android’s built in MediaPlayer:

  • Support for Dynamic Adaptive Streaming over HTTP (DASH) and SmoothStreaming, neither of which are are supported by MediaPlayer (it also supports HTTP Live Streaming (HLS), MP4, MP3, WebM, M4A, MPEG-TS and AAC).
  • Support for advanced HLS features, such as correct handling of #EXT-X-DISCONTINUITY tags.
  • The ability to customize and extend the player to suit your use case. ExoPlayer is designed specifically with this in mind, and allows many components to be replaced with custom implementations.
  • Easily update the player along with your application. Because ExoPlayer is a library that you include in your application apk, you have control over which version you use and you can easily update to a newer version as part of a regular application update.
  • Fewer device specific issues.

Adding ExoPlayer to an Android app

Because ExoPlayer is a library that you include in your application, it can be easily updated along with your app.

Note: ExoPlayer’s standard audio and video components rely on Android’s MediaCodec API, which was released in Android 4.1 (API level 16). Hence they do not work on earlier versions of Android.

Add ExoPlayer to Android Studio

The easiest way to get started using ExoPlayer is by including the following in your project’s build.gradle file:

compile 'com.google.android.exoplayer:exoplayer:r1.5.3'

I’m using release 1.5.3 but you can look at the release history to choose the one you want.

Creating an instance of the ExoPlayer:


private ExoPlayer exoPlayer;
...
@Override
public void onCreate() {
exoPlayer = ExoPlayer.Factory.newInstance(1);
}

Where 1 is the number of renderers to be used. In this case it’s 1 since we will only use an audio renderer. If you need audio and video renderers it should be 2.

Preparing the exoPlayer:

A TrackRenderer plays a specific type of media, such as video, audio or text. The ExoPlayer class invokes methods on its TrackRenderer instances from a single playback thread, and by doing so causes each type of media be rendered as the global playback position is advanced.

The ExoPlayer library provides MediaCodecAudioTrackRenderer for audio. This implementation makes use of Android’s MediaCodec class to decode individual media samples. They can handle all audio and video formats supported by a given Android device.


private static final int BUFFER_SEGMENT_SIZE = 64 * 1024;
private static final int BUFFER_SEGMENT_COUNT = 256;
...
// String with the url of the radio you want to play
String url = getRadioUrl();
Uri radioUri = Uri.parse(url);
// Settings for exoPlayer
Allocator allocator = new DefaultAllocator(BUFFER_SEGMENT_SIZE);
String userAgent = Util.getUserAgent(context, "ExoPlayerDemo");
DataSource dataSource = new DefaultUriDataSource(context, null, userAgent);
ExtractorSampleSource sampleSource = new ExtractorSampleSource(
radioUri, dataSource, allocator, BUFFER_SEGMENT_SIZE * BUFFER_SEGMENT_COUNT);
audioRenderer = new MediaCodecAudioTrackRenderer(sampleSource);
// Prepare ExoPlayer
exoPlayer.prepare(audioRenderer);


The Exo Player library provides ExtractorSampleSource to play traditional media formats, including MP3, M4A, MP4, WebM, MPEG-TS and AAC.

Play and Stop Exo Player:

When all settings are ready, you must call setPlayWhenReady(true) method.
When you are done using it, call exoPlayer.stop() and don’t forget to release with exoPlayer.release()

Add ons:

Checking state:

In order to check the current state of the player we can use getPlayWhenReady() method.


if (exoPlayer != null && exoPlayer.getPlayWhenReady()) {
... do something when exo player is playing...
}

Muting/Unmuting Player:


public static void Mute() {
exoPlayer.sendMessage(audioRenderer, MediaCodecAudioTrackRenderer.MSG_SET_VOLUME, 0f);
}

public static void Play() {
exoPlayer.sendMessage(audioRenderer, MediaCodecAudioTrackRenderer.MSG_SET_VOLUME, 1f);
}

More add ons:

For more features for reproducing audio or video you can visit the ExoPlayer developer guide:

https://google.github.io/ExoPlayer/guide.html

Other resources:

For more information about this library you can take a look at the Google IO video of one of Google’s software engineers Oliver Woodman.